# Forms
We are going to review a Feature of type Command, meaning that the feature writes data into the Application.
The feature is DonationNew from the sample Supportreon.
In this feature, authenticated users can make a donation to a project.
# UI
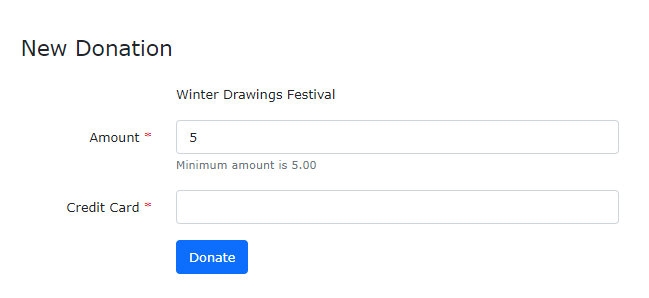
Since a feature is an user action, we can start with the user interface. The DonationNew page should look like this:

The page shows:
- Project's name
The page has inputs for
- Donation's Amount
- User's Credit Card
# Feature Class
In Miru, every feature has a class representing it. It stays in a directory together with other features with the same topic or group.

public class DonationNew
{
}
# Query + Command
This feature has this actions
- User goes to the page (a
Query) - User fills the inputs and click 'donate' (a
Command)
A Query is a request to render a page. A Command is a request to write data into the Application.
# Query
We need a class Query to represent the request to render the page:
public class DonationNew
{
  public class Query : IRequest<Command>
  {
      public long ProjectId { get; init; }
  }
}
A Donation is made for a Project, so ProjectId is a input for the Query. IRequest<Command> means that the Query will return an instance of Command.
# Controller
Controllers in Miru are very simple thin. They do two jobs: configure the route and respond to the request.
public class DonationsController : MiruController
{
    [HttpGet("/Projects/{ProjectId:long}/Donations/New")]
    public async Task<Command> New(Query query) => await SendAsync(query);
}
The New action is HttpGet, receives a Query, sends to Miru to process, returns a Command. Miru will renders a view with the same name as the action. In this case, New.cshtml
# Handler
In Miru, Handlers do the actual work of receiving the requests, going to the database, building entities, saving data, talking to other services, and returning a response:
public class DonationNew
{
  public class Handler : IRequestHandler<Query, Command>, IRequestHandler<Command, Result>
  {
    // constructor & other methods omitted

    public async Task<Command> Handle(Query request, CancellationToken ct)
    {
        var project = await _db.Projects.ByIdOrFailAsync(request.ProjectId, ct);

        return new Command
        {
            ProjectId = request.ProjectId,
            Project = project,
            Amount = project.MinimumDonation
        };
    }
}
# View
Now we have the information to render the view, showing the Project's name and inputs for the Command:
@model DonationNew.Command

<miru-form><!-- form for DonationNew.Command -->

    <miru-summary/>

    <miru-input for="ProjectId"/>

    <div class="row mb-3">
        <span class="col-sm-3 col-form-label"></span>

        <div class="col-sm-9">
            <miru-display for="Project.Name"/>
        </div>
    </div>

    <div class="row mb-3">
        <miru-label for="Amount" class="col-sm-3 col-form-label text-end"/>

        <div class="col-sm-9">
            <miru-input for="Amount"/>
            <small class="form-text text-muted">
                Minimum amount is <miru-display for="Project.MinimumDonation" class="font-weight-bold"/>
            </small>
        </div>
    </div>

    <div class="row mb-3">
        <miru-label for="CreditCard" class="col-sm-3 col-form-label text-end"/>
        <div class="col-sm-9">
            <miru-input for="CreditCard"/>
        </div>
    </div>

    <div class="row mb-3">
        <div class="offset-md-3">
            <miru-submit value="Donate"/>
        </div>
    </div>

</miru-form>

# Review
That's all for the Query part. Basically:
- The user requests through browser the url
/Projects/{ProjectId}/Donations/New - Miru reaches
DonationNew.Controller - Miru sends
DonationNew.Query DonationNew.HandlerreceivesQueryand returnsCommandDonationNew.ControllerrendersNew.cshtmlview- User gets the page